Introduction to Mitosis
All sexually reproducing organisms – including humans – begin life as a fertilized egg. Many rounds of cell division subsequently occur in a controlled manner to produce a complex, multicellular organism. In other words, that original single cell is the ancestor of every other cell in the body.

Figure 1. A sea urchin begins life as a single cell that divides to form two cells. After four rounds of cell division, there are 16 cells, and after many rounds of cell division, the individual develops into a complex, multicellular organism. Credit a and b: modification of work by Evelyn Spiegel, Louisa Howard; Credit c: modification of work by Marco Busdraghi.
Once an organism is fully grown, cell reproduction is still necessary to repair or regenerate tissues. For example, new blood and skin cells are constantly being produced. All multicellular organisms use cell division for growth and the maintenance and repair of cells and tissues. Single-celled organisms use cell division as their method of reproduction.

The cell cycle is an ordered series of events that allows cells to reproduce via cell division. Cells proceed through a series of precisely timed and carefully regulated stages of growth, DNA replication, and division that produces two identical cells. The cell cycle has two major phases: interphase and the mitotic phase. During interphase, the cell grows and DNA is replicated. During the mitotic phase, the replicated DNA and cytoplasmic contents are separated, and the cell divides, resulting in two genetically identical daughter cells.
The Cell Cycle
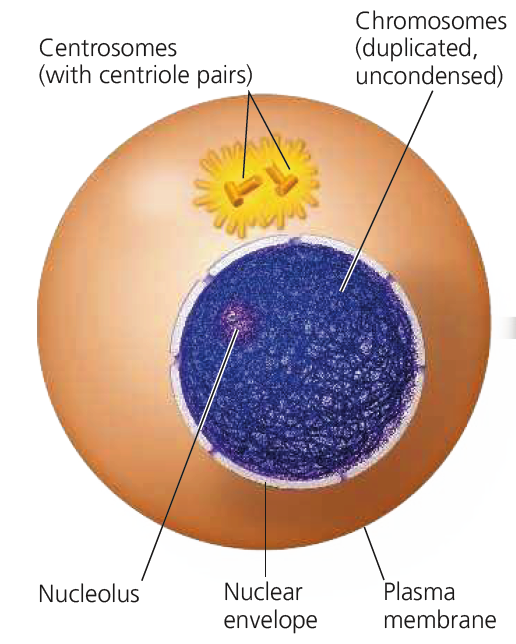
During interphase, the cell undergoes normal growth processes and performs its duties as part of a tissue, while also preparing for cell division. During the G1 (First Gap) Phase, the cell accumulates the building blocks of chromosomal DNA and associated proteins, as well as sufficient energy reserves to complete the task of replicating each chromosome in the nucleus. In the S (Synthesis) Phase, DNA replication creates identical pairs of DNA molecules called sister chromatids. During G2 (Second Gap) Phase, the cell replenishes its energy stores and synthesizes proteins necessary for chromosome manipulation. Some cell organelles are duplicated, there may be additional cell growth during G2.
The Mitotic Phase
The mitotic phase is a multistep process during which the duplicated chromosomes are aligned, separated, and move into two new, identical daughter cells. The life cycle of the cell is typically divided into 5 major phases. The phases are listed below, along with the major events that occur during each phase.
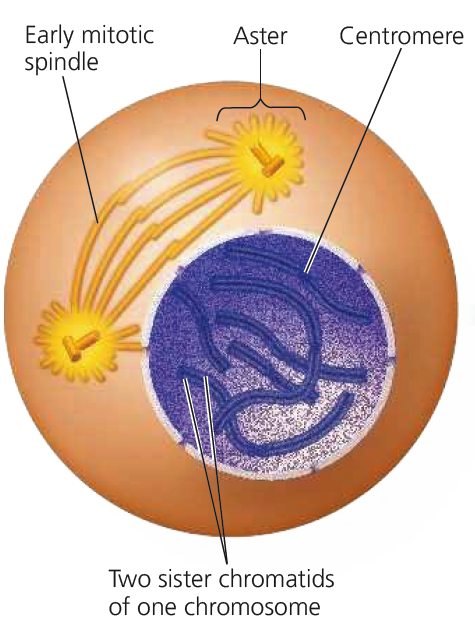
Prophase. Chromatin in the nucleus begins to condense and becomes visible in the light microscope as chromosomes. The nuclear membrane dissolves, and proteins attach to the centromeres, creating the kinetochores. Microtubules attach at the kinetochores and the chromosomes begin moving.
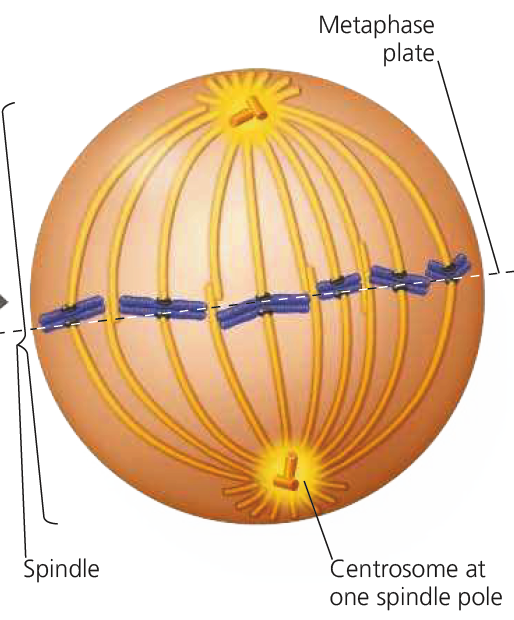
Metaphase. Spindle fibers align the paired sister chromosomes along the middle of the cell nucleus. This line is referred to as the metaphase plate. This organization helps to ensure that in the next phase, when the sister chromosomes are separated, each new nucleus will receive one copy of each chromosome.
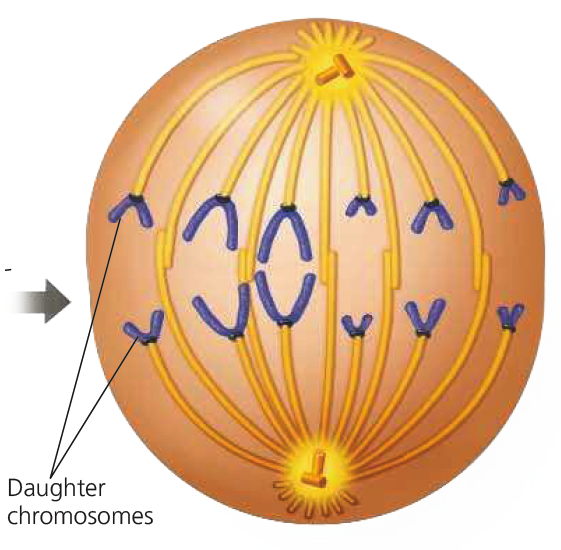
Anaphase. Sister chromosomes separate at the kinetochores and move to opposite sides of the cell. Motion results from a combination of kinetochore movement along the spindle microtubules and through the physical interaction of polar microtubules.
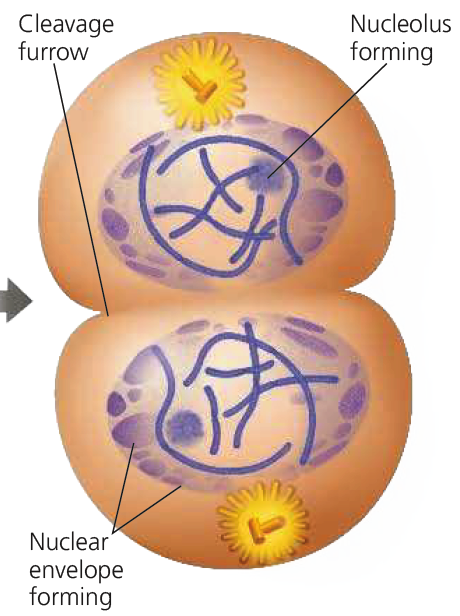
Telophase and Cytokinesis. During telophase, new membranes form around the daughter nuclei while the chromosomes disperse (after which they will no longer be visible under the light microscope).
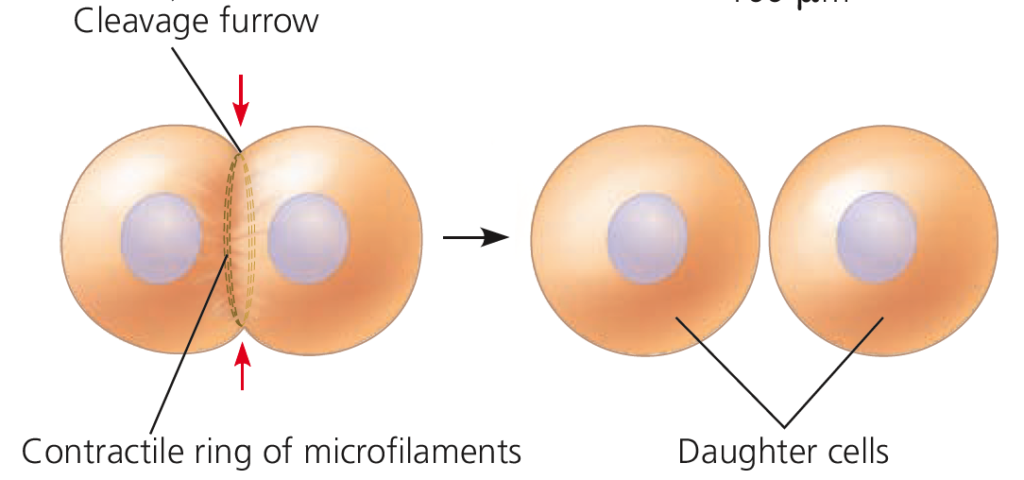
Cytokinesis – the partitioning of the cell – may also begin during this stage.
Text adapted from “Biology” by Openstax College. Download for free at: http://cnx.org/content/col11448/latest/
Microscopy
When we walk out the door each day we see many examples of life on earth – trees, birds, other humans. Unless we look closer we will miss the huge diversity of life that is too small to be seen with our eyes alone. The majority of life on earth is microscopic, and even macroscopic organisms are comprised of cells. Cells vary in size, but most individual cells cannot be seen with the naked eye. To give you an idea about the size of a cell, a typical human red blood cell is about eight millionths of a meter or 8 micrometers (8 μm) in diameter; the head of a pin of is about two thousandths of a meter (2 mm) in diameter. That means about 250 red blood cells could fit on the head of a pin.
One of the first tools that opened our eyes to microbial life and to cells and other structures that are very small, was the microscope, an instrument that magnifies objects. Most student microscopes are compound light microscopes: compound, because they consist of two sets of glass lenses; light, because visible light passes through and is bent by the lens system to enable the user to see the magnified specimen. Our compound microscopes magnify objects from between 4 and 400 times, or, when a technique called oil immersion is used, up to 1,000 times. This allows us to see cells and cell structures, as well as organisms like bacteria, archaea, yeasts, protozoans, and algae that we would never notice because they are so small.
In addition to magnifying organisms, most cells are colorless so preparing slides often involves adding stains (dyes) to color the cells so they are more easily viewed. The slides you will practice with today are either naturally pigmented or have been stained so we can find the organisms or view the structures more easily. Look for these colors as you are focusing the virtual microscope.
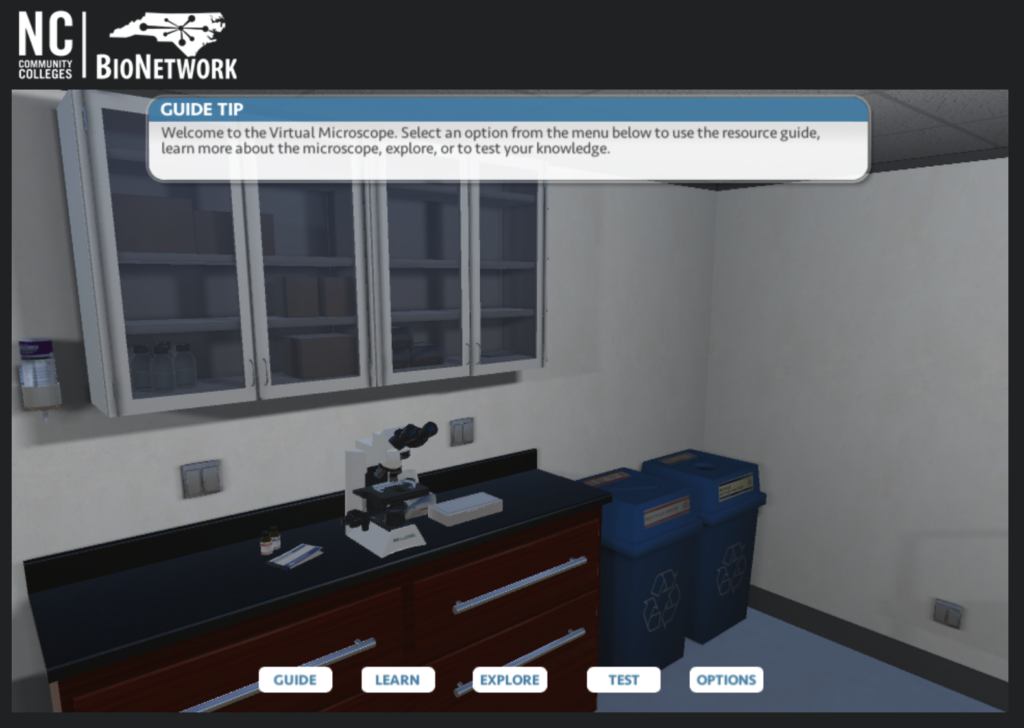
Today, we will learn how to use a microscope by working with a virtual online microscope that has all the features of the microscopes we have in our labs.
Parts of the Microscope
- Ocular: Eyepiece(s) for viewing slides.
- Objective lens: Magnifies specimen.
- Body Tube: Connects the ocular to the objective lenses.
- Turret: Holds objective lenses and can be rotated to easily change power.
- Arm: Supports the tube and connects it to the base.
- Stage: Flat platform where you place your slides.
- Aperture: Hole in stage for light to pass through.
- Course focusing knob: Moves the stage up or down.
- Fine Focusing knob: Allows for precise focusing of the specimen.
- Slide holder: Secures slide so it can be moved using the slide controls.
- Slide controls: Allows you to move the slide in any four directions.
- Condenser lens: Collects and concentrates light from illuminator onto the specimen.
- Diaphragm: Varies intensity & size of cone of light projected onto the slide.
- Illuminator: Steady light source used in place of a mirror.
- Base: Supports bottom.
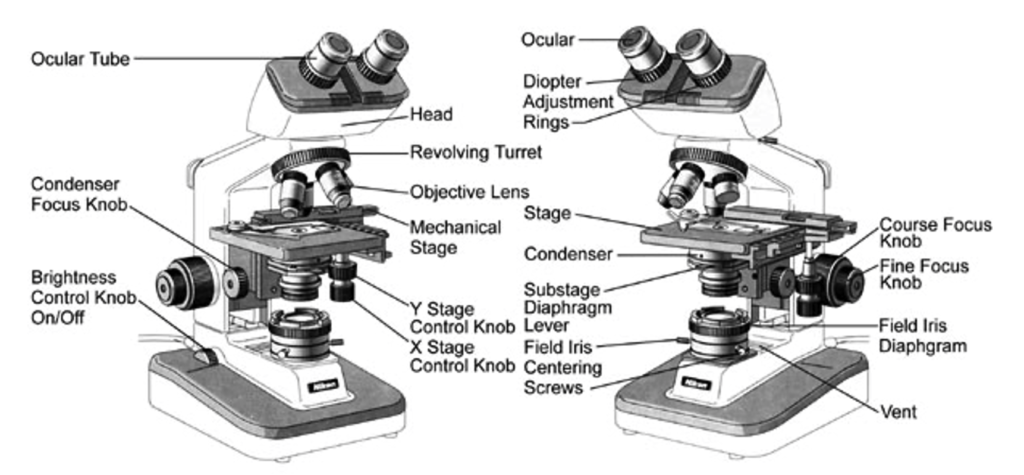
There are two types of glass lenses in a compound microscope: the ocular lenses near the eye, and the objective lens near the subject of interest. There are also two types of focusing mechanisms: the coarse focus, that raises and lowers the stage in large increments, to help get the specimen into your field of view; and the fine focus, which moves the stage small amounts to bring the specimen into clear focus.
Proper Use of the Microscope
- Carry the microscope with both hands, with one hand on the arm, and the other supporting it carefully from underneath. Set your microscope on a tabletop or other flat, sturdy surface where you will have plenty of room to work.
- If you must move the microscope, lift it off the table and place it down in a new location. Do NOT drag the microscope across a table, as this causes vibrations that can damage the optics.
- Make sure that the power is turned off and the light is in the off position, and then plug in the scope to a power outlet.
- Make sure that the mechanical stage is at its lowest point, using the coarse focus adjustment knob to lower it, if necessary, before removing or inserting a slide.
- Clean the lenses and oculars with lens paper. Use only lens paper to clean objectives. Kimwipes will scratch the lenses.
- Select the objective lens with the lowest magnification (4x), and make sure it is pointing directly at the stage. It is easiest to scan a slide at a low setting, since you have a wider field of view at low power.
- Turn on the light, then adjust the diaphragm to the largest hole diameter, allowing the greatest amount of light through.
- Place the slide to be viewed on the mechanical stage and secure it with the slide clips.
- Check it visually (not through the lenses; just look directly at the slide) to make sure that the slide is positioned so that the subject is visible in the lighted area.
- Adjust it with the stage controls if necessary.
- Look through the ocular lenses. You should see a single bright circle of light.
- Slowly, adjust the coarse focus knob until you begin to see the subject on your slide.
- You may also need to slowly move the slide with the stage controls to center the specimen under the lens.
- You must only adjust the coarse focus with the 4x and 10x objective lenses. Using this with the 40x and 100x lenses may cause damage to the microscope and/or slides.
- Adjust the small fine focus knob until the specimen is clearly in focus.
- Then adjust the diaphragm to get the best lighting.
- Start with the most light and gradually lessen it until the specimen image has clear, sharp contrast.
- With the specimen right in the center of your field of view, rotate the nosepiece to the 10x objective lens. Refocus and view your specimen carefully. Adjust the lighting again until the image is most clear (you will need more light for higher power).
- DO NOT switch objectives by grabbing an objective and turning the microscope head. To switch objectives, use the knurled wheel in the microscope head.
- Repeat with the 40x objective, which will enable you to see even more of the specimen’s detail.
- With wet mounts: turn the light down or off, and do not exceed 400x magnification.
- If you wish to magnify even further, using the 100x objective, you will need to do an oil immersion. Light rays bend (diffract) at interfaces between media with different refractive indices, such as air and glass. This creates image distortion and loss of resolution. Oil and glass have similar refractive indices, so filling the space between slide and lens with immersion oil reduces diffraction and increases resolution. However, objectives are specifically designed to work either with or without oil. YOU MUST NOT USE OIL with an objective that is not designed for it.
- DO NOT use immersion oil on the 10x and 40x objectives – only on the 100x objective.
- NEVER USE THE COARSE FOCUS KNOB while using the 100x objective lens. The working distance is so small that you can easily crush the slide and/or the objective.
- Always start with the lowest power objective lens.
- If you are using the oil immersion objective, put oil on the slide, NOT on the lens.
- Always position the slide between the 40x and 100x lenses before adding oil, and before lowering the stage to clean and remove your slide.
- After using immersion oil, you must carefully use lens paper (not Kimwipes) to gently clean your objective lens and slide.
The Microscope and Your Eyes
Students often wonder if they should remove their glasses when using a microscope. While using the virtual microscope, you will want to wear your glasses. However, when using a microscope in the lab, if you are nearsighted or farsighted, there is no need to wear your glasses. The focus adjustments will compensate. If you have astigmatism, however, you should wear your glasses because microscope lenses do not correct for this problem.
Adapted from BioNetwork’s introduction to the virtual microscope: http://www.ncbionetwork.org/iet/microscope/IntroToMicroscope.pdf